[git] Git Bash colorful
git config --global color.ui auto
Ref :
http://unix.stackexchange.com/questions/44266/how-to-colorize-output-of-git
2013年12月23日 星期一

2013年12月3日 星期二
[openflow][floodlight] Openflow arp with floodlight controller
[openflow][floodlight] Openflow arp with floodlight controller
○ Environment Setting :
01. controller , ovs ( s1, s2, s3, s4 ), host ( h1, h2, h3, h4 )
02. h1 is connected in s1 with port1 , h2 is connected in s2 with port2 , h3 is connected in s3 with port4 , h4 is connected in s4 with port3 ;
03. grey line : data plane (path) , blue line : control plane (path)
04. pink tag : ARP Request(BroardCast) , green tag : ARP Reply
05. Openflow PacketIn [PI] : while openflow switch recieve the packet and doesn't know the packet where to forwarding , s1 send the Openflow PacketIn Message which contain the packet to controller
Openflow PacketOut [PO] : controller send the packet out message to openflow switch, which to notify the openflow switch to send the packet.
Openflow Flow Modify [FlowMod] : controller send the flow modify message to openflow switch and set the flow entry to openflow switch.
○ Scenario: h1 ping h4 in openflow environment

○ Sequance Steps :
01. h1 doesn't konw where is the h4 and send the ARP Request(BroardCast) to s1 port1
02. s1 get the ARP Request, but s1 donen't know where is the h4, s1 send the openflow PacketIn Message which contain the ARP Request to Controller(from control path : blue line)
03. controller donen't know where is the h4 and send the openflow PacketOut Message which contain the ARP Request(BroardCast) to s1(from control path : blue line)
04. s1 recieve the PacketOut Message which contain the ARP Request(BroardCast) and broadcast the ARP Request packet from port2 and port3(not port 1, because the ARP Request packet came from port1)
05. s3 recieve the ARP Request from port1, but s3 donen't know where is the h4, s3 send the openflow PacketIn Message which contain ARP Request(BroardCast) to Controller(from control path : blue line)
06. s2 recieve the ARP Request from port1, but s2 donen't know where is the h4, s2 send the openflow PacketIn Message which contain ARP Request(BroardCast) to Controller(from control path : blue line)
07. controller donen't know where is the h4 and send the openflow PacketOut Message which contain the ARP Request(BroardCast) to s2(from control path : blue line)
08. controller donen't know where is the h4 and send the openflow PacketOut Message which contain the ARP Request(BroardCast) to s3(from control path : blue line)
09. s2 recieve the PacketOut Message[Step7] which contain the ARP Request(BroardCast) and broadcast the ARP Request packet from port2 and port3(not port 1, because the ARP Request packet came from port1)
10. s3 recieve the PacketOut Message[Step8] which contain the ARP Request(BroardCast) and broadcast the ARP Request packet from port2 and port3(not port 1, because the ARP Request packet came from port1)
11. s4 recieve the ARP Request[Step9] from port1, but s4 donen't know where is the h4, s4 send the openflow PacketIn Message which contain ARP Request to Controller(from control path : blue line)
12. s4 recieve the ARP Request[Step10] from port2, but s4 donen't know where is the h4, s4 send the openflow PacketIn Message which contain ARP Request to Controller(from control path : blue line)
13. controller recieve the openflow PAcketIn Message[Setp11] donen't know where is the h4 and send the openflow PacketOut Message which contain the ARP Request(BroardCast) to s4(from control path : blue line)
14. s4 recieve the PacketOut Message which contain the ARP Request and broadcast the ARP Request packet from port2 and port3(not port 1, because the ARP Request packet came from port1)
15. h4 recieve the ARP Request from s4 with port3, and found the destination address is itself, h4 send the ARP Reply to s4(the ARP Reply destination is to h1)
16. s3 recieve the ARP Request[Setp14] from port3, but s3 donen't know where is the h4, s4 send the openflow PacketIn Message which contain ARP Request to Controller(from control path : blue line)
17. s4 recieve the ARP Reply[Setp15] from port3, but s4 donen't know where is the h1, s4 send the openflow PacketIn Message which contain ARP Reply to Controller(from control path : blue line)
18. controller recieve the openflow PacketIn Message[Setp17] which contain the ARP Reply, controller has know the h1 is connected in the s1, controller send the openflow Flow Modify Message to s4 and set the flow entry to s4 with [Flow In Port3, Flow Out Port1], controller also send the openflow PacketOut Message which contain ARP Reply Message to s4
19. s4 recieve the openflow Flow Modify Message setting the flow entry to flowtable and recieve the openflow PacketOut Message which contain ARP Reply Message, s4 start forwarding the ARP Reply Message with port1
20. s2 recieve the ARP Reply[Setp19] from port3, but s2 donen't know where is the h1, s2 send the openflow PacketIn Message which contain ARP Reply to Controller(from control path : blue line)
21. controller recieve the openflow PacketIn Message from s2[Setp20] which contain the ARP Reply, controller has known the h1 is connected in the s1, and controller send the openflow Flow Modify Message to s1 and set the flow entry to s1 with [Flow In Port2, Flow Out Port1]
22. controller recieve the openflow PacketIn Message from s2[Setp20] which contain the ARP Reply, controller has known the h1 is connected in the s1, and controller send the openflow Flow Modify Message to s2 and set the flow entry to s2 with [Flow In Port3, Flow Out Port1]
23. s2 recieve the openflow PacketOut Message from controller which contain ARP Reply Message
24. s2 start forwarding the ARP Reply Message from port3 to port1
25. s1 recieve the ARP Reply Message and start forwarding the the ARP Reply Message from port2 to port1
Final : h1 get the arp reply from h4
○ Environment Setting :
01. controller , ovs ( s1, s2, s3, s4 ), host ( h1, h2, h3, h4 )
02. h1 is connected in s1 with port1 , h2 is connected in s2 with port2 , h3 is connected in s3 with port4 , h4 is connected in s4 with port3 ;
03. grey line : data plane (path) , blue line : control plane (path)
04. pink tag : ARP Request(BroardCast) , green tag : ARP Reply
05. Openflow PacketIn [PI] : while openflow switch recieve the packet and doesn't know the packet where to forwarding , s1 send the Openflow PacketIn Message which contain the packet to controller
Openflow PacketOut [PO] : controller send the packet out message to openflow switch, which to notify the openflow switch to send the packet.
Openflow Flow Modify [FlowMod] : controller send the flow modify message to openflow switch and set the flow entry to openflow switch.
○ Scenario: h1 ping h4 in openflow environment
○ Sequance Steps :
01. h1 doesn't konw where is the h4 and send the ARP Request(BroardCast) to s1 port1
02. s1 get the ARP Request, but s1 donen't know where is the h4, s1 send the openflow PacketIn Message which contain the ARP Request to Controller(from control path : blue line)
03. controller donen't know where is the h4 and send the openflow PacketOut Message which contain the ARP Request(BroardCast) to s1(from control path : blue line)
04. s1 recieve the PacketOut Message which contain the ARP Request(BroardCast) and broadcast the ARP Request packet from port2 and port3(not port 1, because the ARP Request packet came from port1)
05. s3 recieve the ARP Request from port1, but s3 donen't know where is the h4, s3 send the openflow PacketIn Message which contain ARP Request(BroardCast) to Controller(from control path : blue line)
06. s2 recieve the ARP Request from port1, but s2 donen't know where is the h4, s2 send the openflow PacketIn Message which contain ARP Request(BroardCast) to Controller(from control path : blue line)
07. controller donen't know where is the h4 and send the openflow PacketOut Message which contain the ARP Request(BroardCast) to s2(from control path : blue line)
08. controller donen't know where is the h4 and send the openflow PacketOut Message which contain the ARP Request(BroardCast) to s3(from control path : blue line)
09. s2 recieve the PacketOut Message[Step7] which contain the ARP Request(BroardCast) and broadcast the ARP Request packet from port2 and port3(not port 1, because the ARP Request packet came from port1)
10. s3 recieve the PacketOut Message[Step8] which contain the ARP Request(BroardCast) and broadcast the ARP Request packet from port2 and port3(not port 1, because the ARP Request packet came from port1)
11. s4 recieve the ARP Request[Step9] from port1, but s4 donen't know where is the h4, s4 send the openflow PacketIn Message which contain ARP Request to Controller(from control path : blue line)
12. s4 recieve the ARP Request[Step10] from port2, but s4 donen't know where is the h4, s4 send the openflow PacketIn Message which contain ARP Request to Controller(from control path : blue line)
13. controller recieve the openflow PAcketIn Message[Setp11] donen't know where is the h4 and send the openflow PacketOut Message which contain the ARP Request(BroardCast) to s4(from control path : blue line)
14. s4 recieve the PacketOut Message which contain the ARP Request and broadcast the ARP Request packet from port2 and port3(not port 1, because the ARP Request packet came from port1)
15. h4 recieve the ARP Request from s4 with port3, and found the destination address is itself, h4 send the ARP Reply to s4(the ARP Reply destination is to h1)
16. s3 recieve the ARP Request[Setp14] from port3, but s3 donen't know where is the h4, s4 send the openflow PacketIn Message which contain ARP Request to Controller(from control path : blue line)
17. s4 recieve the ARP Reply[Setp15] from port3, but s4 donen't know where is the h1, s4 send the openflow PacketIn Message which contain ARP Reply to Controller(from control path : blue line)
18. controller recieve the openflow PacketIn Message[Setp17] which contain the ARP Reply, controller has know the h1 is connected in the s1, controller send the openflow Flow Modify Message to s4 and set the flow entry to s4 with [Flow In Port3, Flow Out Port1], controller also send the openflow PacketOut Message which contain ARP Reply Message to s4
19. s4 recieve the openflow Flow Modify Message setting the flow entry to flowtable and recieve the openflow PacketOut Message which contain ARP Reply Message, s4 start forwarding the ARP Reply Message with port1
20. s2 recieve the ARP Reply[Setp19] from port3, but s2 donen't know where is the h1, s2 send the openflow PacketIn Message which contain ARP Reply to Controller(from control path : blue line)
21. controller recieve the openflow PacketIn Message from s2[Setp20] which contain the ARP Reply, controller has known the h1 is connected in the s1, and controller send the openflow Flow Modify Message to s1 and set the flow entry to s1 with [Flow In Port2, Flow Out Port1]
22. controller recieve the openflow PacketIn Message from s2[Setp20] which contain the ARP Reply, controller has known the h1 is connected in the s1, and controller send the openflow Flow Modify Message to s2 and set the flow entry to s2 with [Flow In Port3, Flow Out Port1]
23. s2 recieve the openflow PacketOut Message from controller which contain ARP Reply Message
24. s2 start forwarding the ARP Reply Message from port3 to port1
25. s1 recieve the ARP Reply Message and start forwarding the the ARP Reply Message from port2 to port1
Final : h1 get the arp reply from h4
[Qt4] QT Creator for windows-based
[Qt4] QT Creator for windows-based
01. Install QT Creator 2.1.0
02. Install QT 4.8.5 SDK
03. Adding System Environment Path : ;C:\Qt\qtcreator-2.1.0\mingw\bin;C:\Qt\4.8.5\bin (Qt5.2.0 : C:\Qt\Qt5.2.0\5.2.0\mingw48_32\bin;C:\Qt\Qt5.2.0\Tools\mingw48_32\bin; )
04. Open QT Creator -> Tools -> Options -> Qt4 ->Add qmake location : c:\qt\4.8.5\qmake\qmake.exe
05. Open QT Creator -> File -> Open File or Project -> select *.pro
01. Install QT Creator 2.1.0
02. Install QT 4.8.5 SDK
03. Adding System Environment Path : ;C:\Qt\qtcreator-2.1.0\mingw\bin;C:\Qt\4.8.5\bin (Qt5.2.0 : C:\Qt\Qt5.2.0\5.2.0\mingw48_32\bin;C:\Qt\Qt5.2.0\Tools\mingw48_32\bin; )
04. Open QT Creator -> Tools -> Options -> Qt4 ->Add qmake location : c:\qt\4.8.5\qmake\qmake.exe
05. Open QT Creator -> File -> Open File or Project -> select *.pro
2013年11月20日 星期三
[Tool] Command line tool to automate Microsoft’s SignCode tool (prevents the password dialog popping up).
[Tool] Command line tool to automate Microsoft’s SignCode tool (prevents the password dialog popping up).
Ref :
http://www.stephan-brenner.com/?page_id=9
http://blog.yam.com/csylvia/article/15633042
2013年8月11日 星期日
[openflow] NOX Controller Build Up
[openflow] NOX Controller Build Up
1.Edit Source List :
Ref:
1.Edit Source List :
- cd /etc/apt/sources.list.d/
- sudo wget http://openflowswitch.org/downloads/debian/nox.list
- sudo apt-get update
- sudo apt-get install nox-dependencies
- sudo apt-get install libtbb-dev
- sudo apt-get install libboost-serialization-dev libboost-all-dev
- git clone git://github.com/noxrepo/nox
- cd nox
- ./boot.sh
- mkdir build/
- cd build/
- ../configure
- make -j 5
- cd /nox/build/src
- ./nox_core -i ptcp:192.168.12.123:6633 switch -v
http://mytestbed.net/projects/openflow/wiki/Installing_a_NOX_controller
2013年7月18日 星期四
2013年7月1日 星期一
[sdn][openflow] OpenFlow protocol primer : Looking under the hood
[sdn][openflow] OpenFlow protocol primer : Looking under the hood
OpenFlow protocol operations
The OpenFlow specification defines a protocol between the controller and the switches and a set of operations on the switches. The controller-to-switch protocol runs over either Transport Layer Security (TLS) or an unprotected TCP connection. Commands from the controller to the switch specify how packets are to be forwarded and configures parameters such as VLAN priorities. Messages from switches inform the controller when links go down or when a packet arrives with no specified forwarding instructions.
Forwarding instructions are based on a flow, which consists of all packets sharing a common set of characteristics. A large variety of parameters can be specified to define a flow. Possible criteria include the switch port where the packet arrived, the source Ethernet port, source IP port, VLAN tag, destination Ethernet or IP port, and a number of other packet characteristics. The controller specifies to the switch the set of parameters that define each flow and how packets that match the flow should be processed.
Each switch maintains a number of flow tables, with each table containing a list of flow entries. Each flow entry contains a match field that defines the flow, a counter and a set of instructions. Entries in the match field contain either a specific value against which the corresponding parameter in the incoming packet is compared or a value indicating that the entry is not included in this flow’s parameter set.
Flow tables are numbered beginning with table zero, with incoming packets first compared to flow table entries in table zero. When a match is found, the flow counter is incremented and the specified set of instructions is carried out.
A new flow must be created when a packet arrives that does not match any flow table entry. The switch may have been configured to simply drop packets for which no flow has been defined, but in most cases, the packet will be sent to the controller. The controller then defines a new flow for that packet and creates one or more flow table entries. It then sends the entry or entries to the switch to be added to flow tables. Finally, the packet is sent back to the switch to be processed as determined by the newly created flow entries.
Flow table instructions modify the action set associated with each packet. Packets begin processing with an empty action set. Actions can specify that the packet be forwarded through a specified port or modify packet TTL, VLAN, MPLS tags or packet QOS.
Instructions in the first flow table may carry out an action on the packet or add actions to be carried out later. Instructions may also direct packet processing to continue by comparing it to entries in another flow table. A flow entry in a subsequent table may contain instructions that add further actions, delete or modify actions added earlier or carry out actions.
An instruction may also add a value called metadata to a packet before sending it to the next flow table. That value becomes an additional parameter to be matched against the metadata value in flow table entries in the next table. Processing continues table by table until all specified instructions have been completed and the packet has been forwarded.
An instruction may specify a group identifier. Groups provide an efficient way to direct that the same set of actions must be carried out on multiple flows. Group operations are defined within the switch by entries in the group table. Each entry consists of its identifier value, a group type, a counter and a set of action buckets. Group type specifies whether all action buckets should be executed, which is useful for implementing broadcast or multicast, or that only specific buckets are to be executed.
OpenFlow protocol messaging
The protocol consists of three types of messages : controller-to-switch, asynchronous and symmetric.
OpenFlow protocol development : A promising future
The Open Networking Foundation was founded in 2011 to develop and standardize OpenFlow. Members include Cisco, Facebook, Google, HP, IBM and Juniper Networks.
The current OpenFlow specification, Version 1.1.0, contains a large number of optional features to enable further experimentation, and work is underway on Version 1.2 of the specification.
While Cisco has not announced an OpenFlow-friendly switch, other switch vendors, such as the IBM and NEC partnership, as well as HP, have implemented OpenFlow in existing products and made these units available for continued development. As vendors and network operators gain further experience with the technology, OpenFlow promises to produce a profound change in the way that networks are managed and operated.
Ref :
http://searchsdn.techtarget.com/feature/OpenFlow-protocol-primer-Looking-under-the-hood
OpenFlow protocol operations
The OpenFlow specification defines a protocol between the controller and the switches and a set of operations on the switches. The controller-to-switch protocol runs over either Transport Layer Security (TLS) or an unprotected TCP connection. Commands from the controller to the switch specify how packets are to be forwarded and configures parameters such as VLAN priorities. Messages from switches inform the controller when links go down or when a packet arrives with no specified forwarding instructions.
Forwarding instructions are based on a flow, which consists of all packets sharing a common set of characteristics. A large variety of parameters can be specified to define a flow. Possible criteria include the switch port where the packet arrived, the source Ethernet port, source IP port, VLAN tag, destination Ethernet or IP port, and a number of other packet characteristics. The controller specifies to the switch the set of parameters that define each flow and how packets that match the flow should be processed.
Each switch maintains a number of flow tables, with each table containing a list of flow entries. Each flow entry contains a match field that defines the flow, a counter and a set of instructions. Entries in the match field contain either a specific value against which the corresponding parameter in the incoming packet is compared or a value indicating that the entry is not included in this flow’s parameter set.
Flow tables are numbered beginning with table zero, with incoming packets first compared to flow table entries in table zero. When a match is found, the flow counter is incremented and the specified set of instructions is carried out.
A new flow must be created when a packet arrives that does not match any flow table entry. The switch may have been configured to simply drop packets for which no flow has been defined, but in most cases, the packet will be sent to the controller. The controller then defines a new flow for that packet and creates one or more flow table entries. It then sends the entry or entries to the switch to be added to flow tables. Finally, the packet is sent back to the switch to be processed as determined by the newly created flow entries.
Flow table instructions modify the action set associated with each packet. Packets begin processing with an empty action set. Actions can specify that the packet be forwarded through a specified port or modify packet TTL, VLAN, MPLS tags or packet QOS.
Instructions in the first flow table may carry out an action on the packet or add actions to be carried out later. Instructions may also direct packet processing to continue by comparing it to entries in another flow table. A flow entry in a subsequent table may contain instructions that add further actions, delete or modify actions added earlier or carry out actions.
An instruction may also add a value called metadata to a packet before sending it to the next flow table. That value becomes an additional parameter to be matched against the metadata value in flow table entries in the next table. Processing continues table by table until all specified instructions have been completed and the packet has been forwarded.
An instruction may specify a group identifier. Groups provide an efficient way to direct that the same set of actions must be carried out on multiple flows. Group operations are defined within the switch by entries in the group table. Each entry consists of its identifier value, a group type, a counter and a set of action buckets. Group type specifies whether all action buckets should be executed, which is useful for implementing broadcast or multicast, or that only specific buckets are to be executed.
OpenFlow protocol messaging
The protocol consists of three types of messages : controller-to-switch, asynchronous and symmetric.
- Controller-to-switch messages are sent by the controller to :
- Specify, modify or delete flow definitions
- Request information on switch capabilities
- Retrieve information like counters from the switch
- Send a packet back to a switch for processing after a new flow is created
- Asynchronous messages are sent by the switch to :
- Send the controller a packet that does not match an existing flow
- Inform the controller that a flow has been removed because its time to live parameter or inactivity timer has expired
- Inform the controller of a change in port status or that an error as occurred on the switch
- Symmetric messages can be sent by both the switch or the controller and are used for :
- Hello messages exchanged between controller and switch on startup
- Echo messages used to determine the latency of the controller-to-switch connection and to verify that the controller-to-switch connection is still operative
- Experimenter messages to provide a path for future extensions to OpenFlow technology
OpenFlow protocol development : A promising future
The Open Networking Foundation was founded in 2011 to develop and standardize OpenFlow. Members include Cisco, Facebook, Google, HP, IBM and Juniper Networks.
The current OpenFlow specification, Version 1.1.0, contains a large number of optional features to enable further experimentation, and work is underway on Version 1.2 of the specification.
While Cisco has not announced an OpenFlow-friendly switch, other switch vendors, such as the IBM and NEC partnership, as well as HP, have implemented OpenFlow in existing products and made these units available for continued development. As vendors and network operators gain further experience with the technology, OpenFlow promises to produce a profound change in the way that networks are managed and operated.
Ref :
http://searchsdn.techtarget.com/feature/OpenFlow-protocol-primer-Looking-under-the-hood
2013年6月16日 星期日
[c] Strings as arrays, as pointers
[c] Strings as arrays, as pointers
void PrintLabel(char the_label[])
{
printf("Label: %s\n", the_label);
}
OR
void PrintLabel(char *the_label)
{
printf("Label: %s\n", the_label);
}
Ref :
http://www.cs.bu.edu/teaching/c/string/intro/
http://www.cs.bu.edu/teaching/
void PrintLabel(char the_label[])
{
printf("Label: %s\n", the_label);
}
OR
void PrintLabel(char *the_label)
{
printf("Label: %s\n", the_label);
}
Ref :
http://www.cs.bu.edu/teaching/c/string/intro/
http://www.cs.bu.edu/teaching/
2013年6月3日 星期一
[tool][vp-uml] Reverse Java to Sequence Diagram not working on "Please select an operation"
[tool][vp-uml] Reverse Java to Sequence Diagram not working on "Please select an operation"
Problem :
I can not generate any diagram and was stopped by a pop up message "Please select an operation."

Answer :
Ref :
http://forums.visual-paradigm.com/posts/list/293742.html;jsessionid=7528C36EEC4C153C974797A031ADC825#806825
http://knowhow.visual-paradigm.com/uml/rev-java-to-seq-diagram-oper-selection/
http://www.youtube.com/watch?v=yTUGGL1ILr4
http://webcache.googleusercontent.com/search?q=cache:XYms4U397W0J:club.topsage.com/thread-2298277-1-1.html+&cd=1&hl=zh-TW&ct=clnk&gl=tw&lr=lang_zh-CN%7Clang_zh-TW
Problem :
I can not generate any diagram and was stopped by a pop up message "Please select an operation."
Answer :
- This problem should be caused by you specified the wrong source folder for the reverse engineering. Please reference to the following movie to solve this problem.
- http://www.youtube.com/watch?v=yTUGGL1ILr4
Ref :
http://forums.visual-paradigm.com/posts/list/293742.html;jsessionid=7528C36EEC4C153C974797A031ADC825#806825
http://knowhow.visual-paradigm.com/uml/rev-java-to-seq-diagram-oper-selection/
http://www.youtube.com/watch?v=yTUGGL1ILr4
http://webcache.googleusercontent.com/search?q=cache:XYms4U397W0J:club.topsage.com/thread-2298277-1-1.html+&cd=1&hl=zh-TW&ct=clnk&gl=tw&lr=lang_zh-CN%7Clang_zh-TW
2013年5月27日 星期一
[tool][mininet][floodlight] Installing mininet and floodlight testing environment
[tool][mininet][floodlight] Installing mininet and floodlight testing environment
01. Update ubuntu 12.04 source.list
02. installing mininet
03. INSTALLING Floodlight
Ref :
01. Update ubuntu 12.04 source.list
- File Location - /etc/apt/source.list
- vim replace url string - :%s/tw.archive.ubuntu.com/free.nchc.org.tw/g (please don't copy and paste)
- apt-get update
02. installing mininet
- sudo apt-get install mininet/precise-backports
- sudo service openvswitch-controller stop
- sudo update-rc.d openvswitch-controller disable
03. INSTALLING Floodlight
- Prerequisites : sudo apt-get install build-essential default-jdk ant python-dev eclipse git
- Download And Build :
- git clone git://github.com/floodlight/floodlight.git
- cd floodlight
- git checkout fl-last-passed-build
- ant
- chmod -R 755 floodlight/
- Setting Up Eclipse :
- ant eclipse
- Open eclipse and create a new workspace
- File -> Import -> General -> Existing Projects into Workspace. Then click “Next”.
- From “Select root directory” click “Browse”. Select the parent directory where you placed floodlight earlier.
- Check the box for “Floodlight”. No other Projects should be present and none should be selected.
- Click Finish.
- Click Window->Open Perspective->Java
- Click Window->Show View->Navigator
- Click Run->Run Configurations
- Right Click Java Application->New
- For Name use FloodlightLaunch
- For Project use Floodlight
- For Main use net.floodlightcontroller.core.Main
- Click Apply
Ref :
http://vim.wikia.com/wiki/Search_and_replace
http://mininet.org/download/
http://docs.projectfloodlight.org/display/floodlightcontroller/Installation+Guide
2013年5月15日 星期三
[tool][wireshark][openflow] Installing wireshark on linux for openflow packet captures
[tool][wireshark][openflow] Installing wireshark on linux for openflow packet captures
01. INSTALLING WIRESHARK FROM REPOSITORIES
02. DOWNLOAD AND INSTALLING THE OPENFLOW WIRESHARK DISSECTOR OPTION #2
03. EDIT PACket-openflow.c File
04. make PACKET-OPENFLOW.o and install into wireshark plugin
Ref :
http://networkstatic.net/installing-wireshark-on-linux-for-openflow-packet-captures/
01. INSTALLING WIRESHARK FROM REPOSITORIES
- apt-get update && apt-get install wireshark-dev wireshark mercurial git
02. DOWNLOAD AND INSTALLING THE OPENFLOW WIRESHARK DISSECTOR OPTION #2
- git clone git://openflow.org/openflow.git
- cd openflow/
- ./boot.sh
- ./configure
- make
- sudo make install
- cd utilities/wireshark_dissectors/openflow/
03. EDIT PACket-openflow.c File
- vim openflow/utilities/wireshark_dissectors/openflow/utilities/wireshark_dissectors/openflow/packet-openflow.c
- void proto_reg_handoff_openflow(){openflow_handle = create_dissector_handle(dissect_openflow, proto_openflow);//dissector_add(TCP_PORT_FILTER, global_openflow_proto, openflow_handle);dissector_add_unit(TCP_PORT_FILTER, global_openflow_proto, openflow_handle);}
04. make PACKET-OPENFLOW.o and install into wireshark plugin
- directory : openflow/utilities/wireshark_dissectors/openflow/utilities/wireshark_dissectors/openflow/
- make
- sudo make install
- cp /var/packet-openflow.so /usr/lib/wireshark/libwireshark1/plugins/
Ref :
http://networkstatic.net/installing-wireshark-on-linux-for-openflow-packet-captures/
2013年4月15日 星期一
[c][cpp] Guide to Network Programming
[c][cpp] Guide to Network Programming

What is a socket?
- a way to speak to other programs using standard Unix file descriptors.
- “If it's a file descriptor, why in the name of Neptune can't I just use the normal read() and write() calls to communicate through the socket?” The short answer is, “You can!” The longer answer is, “You can, but send() and recv() offer much greater control over your data transmission.”
Two Types of Internet Sockets
- One is “Stream Sockets”; the other is “Datagram Sockets”.
- Stream sockets are reliable two-way connected communication streams. If you output two items into the socket in the order “1, 2”, they will arrive in the order “1, 2” at the opposite end. They will also be error-free. Stream sockets use a protocol called “Transmission Control Protocol”, otherwise known as “TCP” (see RFC 7936 for extremely detailed info on TCP.) TCP makes sure your data arrives sequentially and error-free.
- Datagram sockets? Why are they called connectionless? What is the deal, here, anyway? Why are they unreliable? Well, here are some facts: if you send a datagram, it may arrive. It may arrive out of order. If it arrives, the data within the packet will be error-free. They use the “User Datagram Protocol”, “UDP” (see RFC 7688.) don't have to maintain an open connection as you do with stream sockets. You just build a packet, slap an IP header on it with destination information, and send it out. No connection needed. Example : tftp and similar programs have their own protocol on top of UDP. The tftp protocol says that for each packet that gets sent, the recipient has to send back a packet that says, “I got it!” (an “ACK” packet.) If the sender of the original packet gets no reply in, say, five seconds, he'll re-transmit the packet until he finally gets an ACK. This acknowledgment procedure is very important when implementing reliable SOCK_DGRAM applications. Why would you use an unreliable underlying protocol? Two reasons: speed and speed.
Data Encapsulation
- Basically, it says this: a packet is born, the packet is wrapped ("encapsulated") in a header (and rarely afooter) by the first protocol (say, the TFTP protocol), then the whole thing (TFTP header included) is encapsulated again by the next protocol (say, UDP), then again by the next (IP), then again by the final protocol on the hardware (physical) layer (say, Ethernet).
- When another computer receives the packet, the hardware strips the Ethernet header, the kernel strips the IP and UDP headers, the TFTP program strips the TFTP header, and it finally has the data.
Byte Order
- The thing is, everyone in the Internet world has generally agreed that if you want to represent the two-byte hex number, say b34f, you'll store it in two sequential bytes b3 followed by 4f. Makes sense, and, as Wilford Brimley would tell you, it's the Right Thing To Do. This number, stored with the big end first, is called Big-Endian. The more-sane Big-Endian is also called Network Byte Order because that's the order us network types like.While the Host Byte Order isn't right, and you always run the value through function to set it to Network Byte Order.
- Conversion Functions :
htons() host to network short htonl() host to network long ntohs() network to host short ntohl() network to host long
Ref :
http://beej.us/guide/bgnet/output/html/singlepage/bgnet.html
http://techpubs.sgi.com/library/dynaweb_docs/0530/SGI_Developer/books/IRIX_NetPG/sgi_html/ch04.html
http://mi.nou.edu.tw/yen/Ch8-ok.pdf
http://content.edu.tw/primary/info_edu/cy_sa/report/more/8611a8.htm
http://techpubs.sgi.com/library/dynaweb_docs/0530/SGI_Developer/books/IRIX_NetPG/sgi_html/ch04.html
http://mi.nou.edu.tw/yen/Ch8-ok.pdf
http://content.edu.tw/primary/info_edu/cy_sa/report/more/8611a8.htm
2013年4月12日 星期五
[eclipse][c] Eclipse console does not show output on Windows
[eclipse][c] Eclipse console does not show output on Windows
In Eclipse CDT on Windows, standard output of the program being run or debugged is fully buffered, because it is not connected to a Windwos console, but to a pipe. See bug 173732 for more details. Either add fflush calls after every printf or add the following lines in the start of the main function:
In Eclipse CDT on Windows, standard output of the program being run or debugged is fully buffered, because it is not connected to a Windwos console, but to a pipe. See bug 173732 for more details. Either add fflush calls after every printf or add the following lines in the start of the main function:
setvbuf(stdout, NULL, _IONBF, 0);
setvbuf(stderr, NULL, _IONBF, 0);
Ref :
http://wiki.eclipse.org/CDT/User/FAQ#Eclipse_console_does_not_show_output_on_Windows
2013年4月10日 星期三
[eclipse][c][cpp] Eclipse C&Cpp Development
[eclipse][c][cpp] Eclipse C&Cpp Development
7.Select project type as Hello World ANSI C Project
8.Select Tool-chain as MinGW GCC
10.Input your details
12.Select
15.Click button
16.If you get a message to switch perspective, Click Yes
2.Eclipse would list executables and libraries of the project here.
3.Eclipse would list include directories and header files here.
4.Eclipse generated folder. The name is derived from the build configuration.
5.Eclipse generated Makefiles
6.The actual source file.
Ref :
http://eclipsebook.in/advanced-eclipse/extending-eclipse/installing-cdt/
http://eclipsebook.in/c-cpp-development/building-code/build-eclipse-managed/
1.Download and Decompress Eclipse IDE for C/C++ Developers
2.Download and Install MinGW
- Directory : C:\MinGW
- Environment Variable [PATH] : PATH=C:\MinGW\bin
- Renaming C:\MinGW\bin\mingw32-make.exe to C:\MinGW\bin\make.exe
3.Installing Eclipse Plugin : C/C++ Development tool CDT
- Go to
- Add CDT to Available Software Sites
- Select the main CDT Plugin for installation : CDT Main Features
4.Click
5.Select C Project
6.Name the project as Hello World
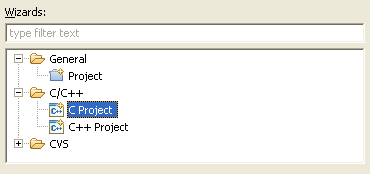
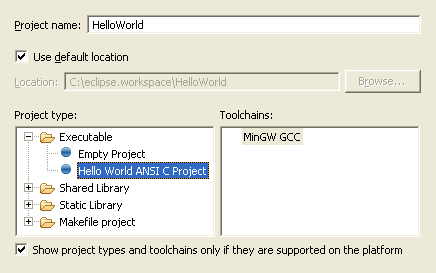
7.Select project type as Hello World ANSI C Project
8.Select Tool-chain as MinGW GCC
9.Click button
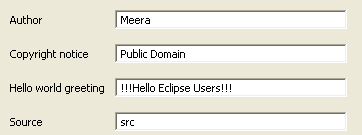
10.Input your details
11.Click button
12.Select
13.Select Current bulder as Gnu Make Builder
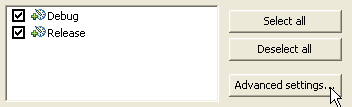
14.Click button
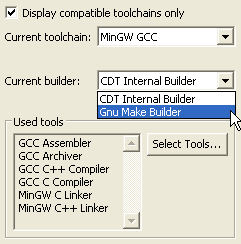
15.Click button
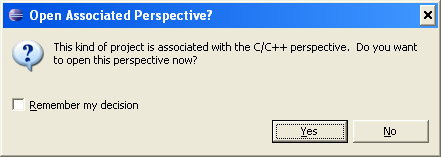
16.If you get a message to switch perspective, Click Yes
This happens if the previous perspective was not C/C++ perspective.
This is how the Project Explorer view would look like.
1.The name of the project HelloWorld
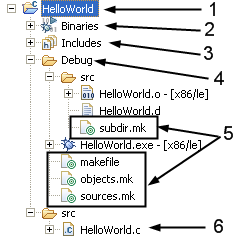
2.Eclipse would list executables and libraries of the project here.
3.Eclipse would list include directories and header files here.
4.Eclipse generated folder. The name is derived from the build configuration.
5.Eclipse generated Makefiles
6.The actual source file.
To build the project, do either of:
Ref :
http://eclipsebook.in/advanced-eclipse/extending-eclipse/installing-cdt/
http://eclipsebook.in/c-cpp-development/building-code/build-eclipse-managed/
2013年4月2日 星期二
[java] Controlling Access to Members of a Class
[java] Controlling Access to Members of a Class
| Modifier | Class | Package | Subclass | World |
|---|---|---|---|---|
public |
Y
|
Y
|
Y
|
Y
|
protected |
Y
|
Y
|
Y
|
N
|
no modifier
|
Y
|
Y
|
N
|
N
|
private |
Y
|
N
|
N
|
N
|
Ref :
http://docs.oracle.com/javase/tutorial/java/javaOO/accesscontrol.html
2013年4月1日 星期一
[synchronized][java] Java Concurrency Read/Write Locks
[synchronized][java] Java Concurrency Read/Write Locks
A read / write lock is more sophisticated lock than the Lock implementations shown in the text Locks in Java. Imagine you have an application that reads and writes some resource, but writing it is not done as much as reading it is. Two threads reading the same resource does not cause problems for each other, so multiple threads that want to read the resource are granted access at the same time, overlapping. But, if a single thread wants to write to the resource, no other reads nor writes must be in progress at the same time. To solve this problem of allowing multiple readers but only one writer, you will need a read / write lock.
Java 5 comes with read / write lock implementations in the java.util.concurrent package. Even so, it may still be useful to know the theory behind their implementation
Read / Write Lock Java Implementation
First let's summarize the conditions for getting read and write access to the resource:
Read Access If no threads are writing, and no threads have requested write access.
Write Access If no threads are reading or writing.
If a thread wants to read the resource, it is okay as long as no threads are writing to it, and no threads have requested write access to the resource. By up-prioritizing write-access requests we assume that write requests are more important than read-requests. Besides, if reads are what happens most often, and we did not up-prioritize writes, starvation could occur. Threads requesting write access would be blocked until all readers had unlocked the ReadWriteLock. If new threads were constantly granted read access the thread waiting for write access would remain blocked indefinately, resulting in starvation. Therefore a thread can only be granted read access if no thread has currently locked the ReadWriteLock for writing, or requested it locked for writing.
A thread that wants write access to the resource can be granted so when no threads are reading nor writing to the resource. It doesn't matter how many threads have requested write access or in what sequence, unless you want to guarantee fairness between threads requesting write access.
With these simple rules in mind we can implement a ReadWriteLock as shown below:
The ReadWriteLock has two lock methods and two unlock methods. One lock and unlock method for read access and one lock and unlock for write access.
The rules for write access are implemented in the lockWrite() method. A thread that wants write access starts out by requesting write access (writeRequests++). Then it will check if it can actually get write access. A thread can get write access if there are no threads with read access to the resource, and no threads with write access to the resource. How many threads have requested write access doesn't matter.
It is worth noting that both unlockRead() and unlockWrite() calls notifyAll() rather than notify(). To explain why that is, imagine the following situation:
Inside the ReadWriteLock there are threads waiting for read access, and threads waiting for write access. If a thread awakened by notify() was a read access thread, it would be put back to waiting because there are threads waiting for write access. However, none of the threads awaiting write access are awakened, so nothing more happens. No threads gain neither read nor write access. By calling noftifyAll() all waiting threads are awakened and check if they can get the desired access.
Calling notifyAll() also has another advantage. If multiple threads are waiting for read access and none for write access, and unlockWrite() is called, all threads waiting for read access are granted read access at once - not one by one.
Read / Write Lock Reentrance
02. http://ilkinbalkanay.blogspot.tw/2008/01/readwritelock-example-in-java.html
03. http://www.jdon.com/34773
A read / write lock is more sophisticated lock than the Lock implementations shown in the text Locks in Java. Imagine you have an application that reads and writes some resource, but writing it is not done as much as reading it is. Two threads reading the same resource does not cause problems for each other, so multiple threads that want to read the resource are granted access at the same time, overlapping. But, if a single thread wants to write to the resource, no other reads nor writes must be in progress at the same time. To solve this problem of allowing multiple readers but only one writer, you will need a read / write lock.
Java 5 comes with read / write lock implementations in the java.util.concurrent package. Even so, it may still be useful to know the theory behind their implementation
Read / Write Lock Java Implementation
First let's summarize the conditions for getting read and write access to the resource:
Read Access If no threads are writing, and no threads have requested write access.
Write Access If no threads are reading or writing.
If a thread wants to read the resource, it is okay as long as no threads are writing to it, and no threads have requested write access to the resource. By up-prioritizing write-access requests we assume that write requests are more important than read-requests. Besides, if reads are what happens most often, and we did not up-prioritize writes, starvation could occur. Threads requesting write access would be blocked until all readers had unlocked the ReadWriteLock. If new threads were constantly granted read access the thread waiting for write access would remain blocked indefinately, resulting in starvation. Therefore a thread can only be granted read access if no thread has currently locked the ReadWriteLock for writing, or requested it locked for writing.
A thread that wants write access to the resource can be granted so when no threads are reading nor writing to the resource. It doesn't matter how many threads have requested write access or in what sequence, unless you want to guarantee fairness between threads requesting write access.
With these simple rules in mind we can implement a ReadWriteLock as shown below:
1 2 3 4 5 6 7 8 9 10 11 12 13 14 15 16 17 18 19 20 21 22 23 24 25 26 27 28 29 30 31 32 33 | public class ReadWriteLock{ private int readers = 0; private int writers = 0; private int writeRequests = 0; public synchronized void lockRead() throws InterruptedException{ while(writers > 0 || writeRequests > 0){ wait(); } readers++; } public synchronized void unlockRead(){ readers--; notifyAll(); } public synchronized void lockWrite() throws InterruptedException{ writeRequests++; while(readers > 0 || writers > 0){ wait(); } writeRequests--; writers++; } public synchronized void unlockWrite() throws InterruptedException{ writers--; notifyAll(); } } |
The rules for read access are implemented in the lockRead() method. All threads get read access unless there is a thread with write access, or one or more threads have requested write access.
The rules for write access are implemented in the lockWrite() method. A thread that wants write access starts out by requesting write access (writeRequests++). Then it will check if it can actually get write access. A thread can get write access if there are no threads with read access to the resource, and no threads with write access to the resource. How many threads have requested write access doesn't matter.
It is worth noting that both unlockRead() and unlockWrite() calls notifyAll() rather than notify(). To explain why that is, imagine the following situation:
Inside the ReadWriteLock there are threads waiting for read access, and threads waiting for write access. If a thread awakened by notify() was a read access thread, it would be put back to waiting because there are threads waiting for write access. However, none of the threads awaiting write access are awakened, so nothing more happens. No threads gain neither read nor write access. By calling noftifyAll() all waiting threads are awakened and check if they can get the desired access.
Calling notifyAll() also has another advantage. If multiple threads are waiting for read access and none for write access, and unlockWrite() is called, all threads waiting for read access are granted read access at once - not one by one.
The ReadWriteLock class shown earlier is not reentrant. If a thread that has write access requests it again, it will block because there is already one writer - itself. Furthermore, consider this case:
Thread 1 gets read access.
Thread 2 requests write access but is blocked because there is one reader.
Thread 1 re-requests read access (re-enters the lock), but is blocked because there is a write request
In this situation the previous ReadWriteLock would lock up - a situation similar to deadlock. No threads requesting neither read nor write access would be granted so.
To make the ReadWriteLock reentrant it is necessary to make a few changes. Reentrance for readers and writers will be dealt with separately.
Ref :
01. http://java.dzone.com/news/java-concurrency-read-write-lo?page=0,002. http://ilkinbalkanay.blogspot.tw/2008/01/readwritelock-example-in-java.html
03. http://www.jdon.com/34773
訂閱:
文章 (Atom)